EDM 510: Course Reflection

Somehow, the summer semester has come to an end. At times, it seemed like things would never slow down, but I genuinely enjoyed this class! I learned so much that I know I will be able to take to my own classroom and I am very grateful for that. My coworkers have seen some of the projects I worked on and were very eager for me to show them how they can use these tools in their classrooms as well. I’ve enjoyed being able to use what I’ve learned in real time.

I’d like to start with my biggest takeaways from this course. The first is don’t be afraid to try new things and leave your comfort zone. I like to think of myself as sort of tech savvy, but taking this class has certainly raised me up a step or two. I was constantly pushed to figure out something new/semi-new. Despite my cool and calm demeanor, I freaked out over quite a few assignments. I never expected to test my personal limits so much (especially in the summer). The next takeaway is that there is always something new to be learned. You can’t think just because you’re familiar with a program that you know all there is to it. With frequent updates and additions, it’s very important to be willing to continue your learning. There were quite a few assignments that I went into thinking they would be a breeze because I had heard of what we were working on or seen a friend use it in their classroom. I quickly had to humble myself and realize that I don’t know it all, not even close. Seeing a friend use SeeSaw in their classroom doesn’t make you an expert and it doesn’t mean you can download the app and perfectly integrate it with your instruction overnight. When it comes to educational technology, your learning is constant. It honestly may never end because there will always be something new. I even encountered some apps that I either thought I knew how to use or had a ‘training’ on how they work. I probably learned more in those weeks because I had to force myself to find out as much as I could so that I would be prepared to complete my assignment. If you can’t stay willing to continue learning, you will never be able to grow in your profession. You can’t expect different results when you are doing the same things you’ve always done. Now is the time to figure it out what works for you and how you can incorporate it into your teaching. My final takeaway is time management is key. Each of the technologies I learned about were very fun/cool/innovative/engaging and so on, but some of these programs take serious time to figure out. It’s unrealistic to think I would master them all, but some really threw me for a loop at times. And some were honestly just more time consuming than I anticipated (I’m looking at you video editing). I’m only okay at time management; it has never been my strongest skill. This class forced me to reassess how I plan and allot time for tasks. This carries over into my professional life as well. As I prepare for my students to come back, I’ve already found myself planning in a way that I typically wouldn’t have before. One of my personal goals for the year is to stick to the schedule I create and waste less time.

I honestly can say my favorite assignment was the video editing project. I say this was my favorite because I think it was one of the most fun projects and certainly the most challenging for me. I had never included B-roll in a video and really wasn’t sure what it even was. I had to figure that part out first. I recorded all of my clips, gathered some photos, found some royalty free music, and then stared at my computer for a couple of days because I didn’t know what to do next. Figuring out how to edit was very challenging in my favorite way. It pushed me to try something new and learn how to use it. I think I can see myself eventually using video creation in my classroom.

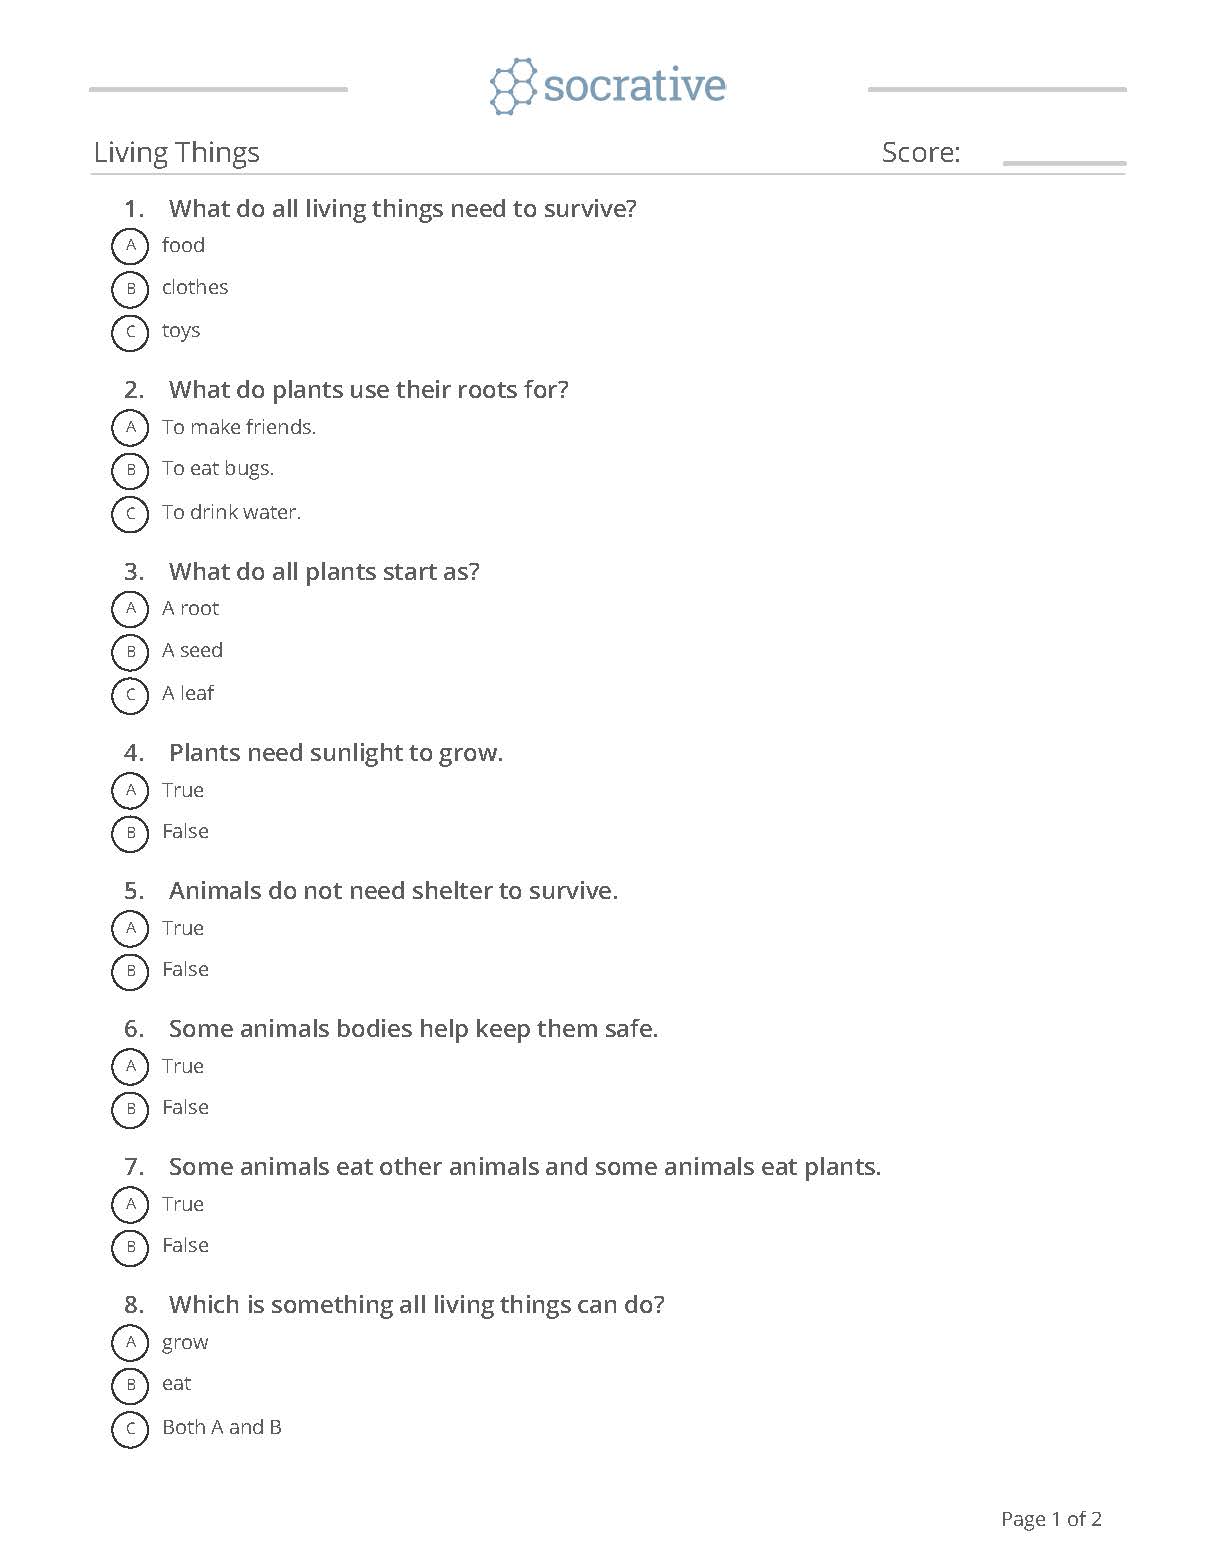
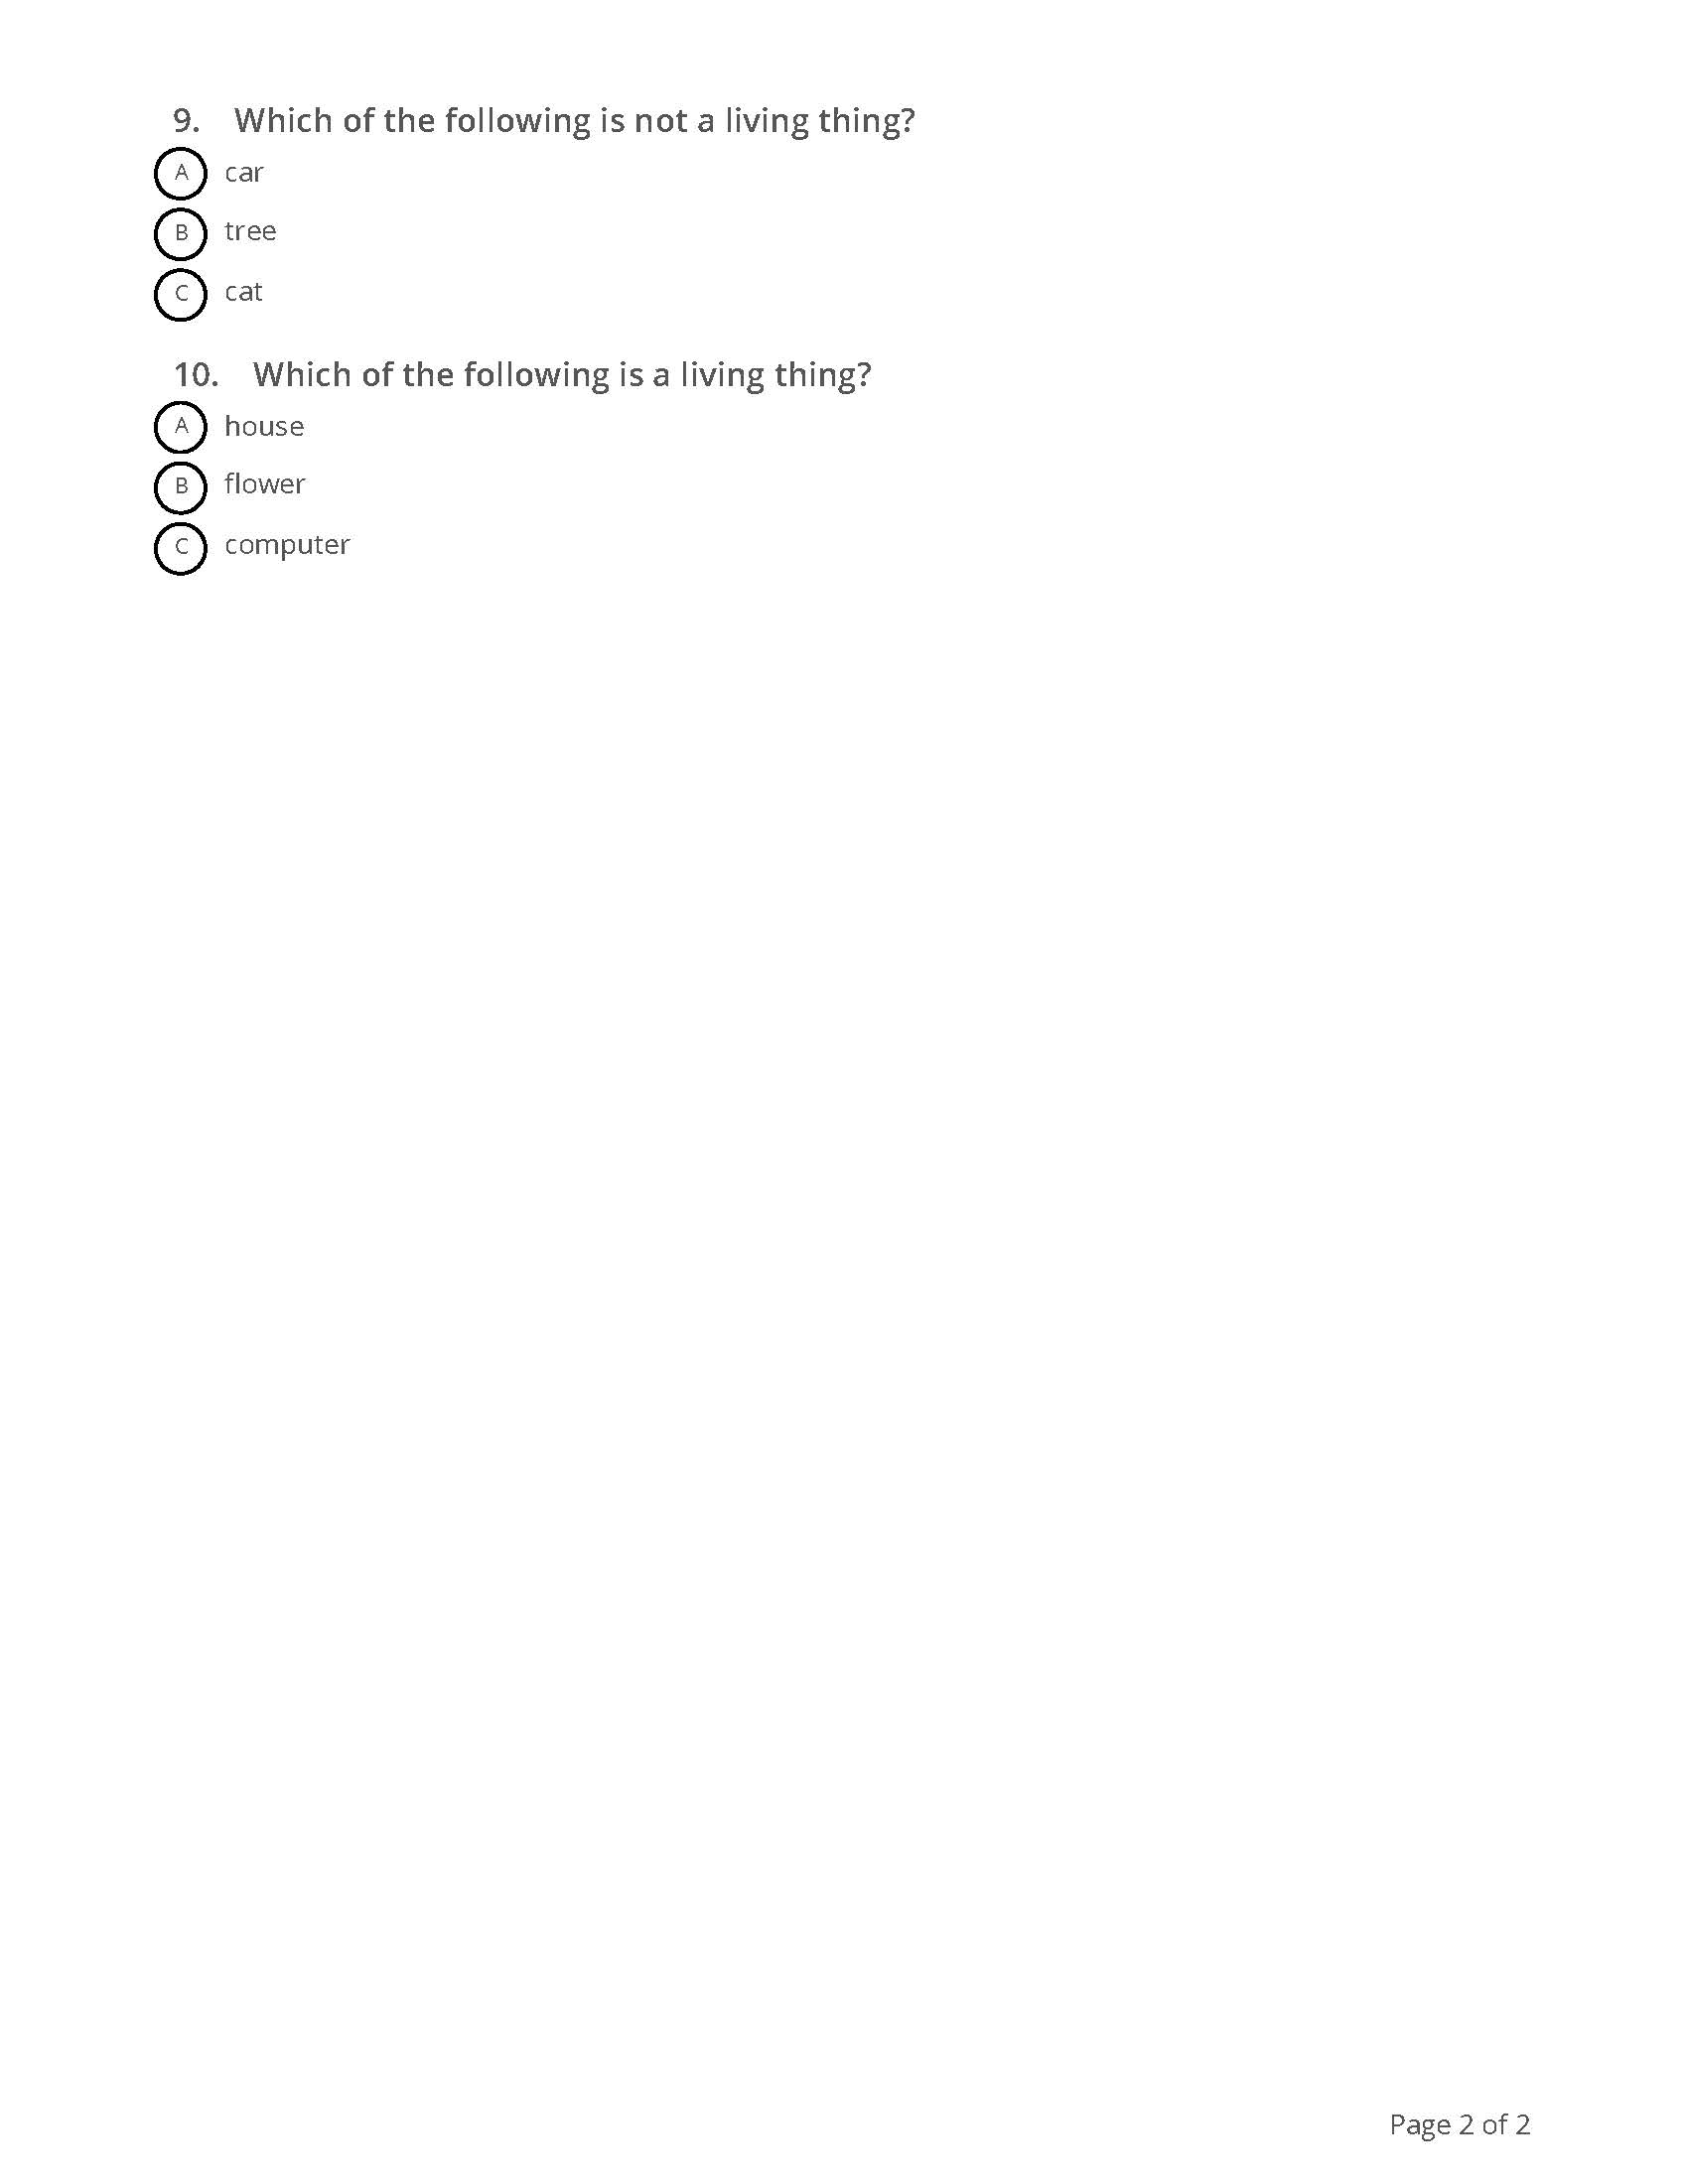
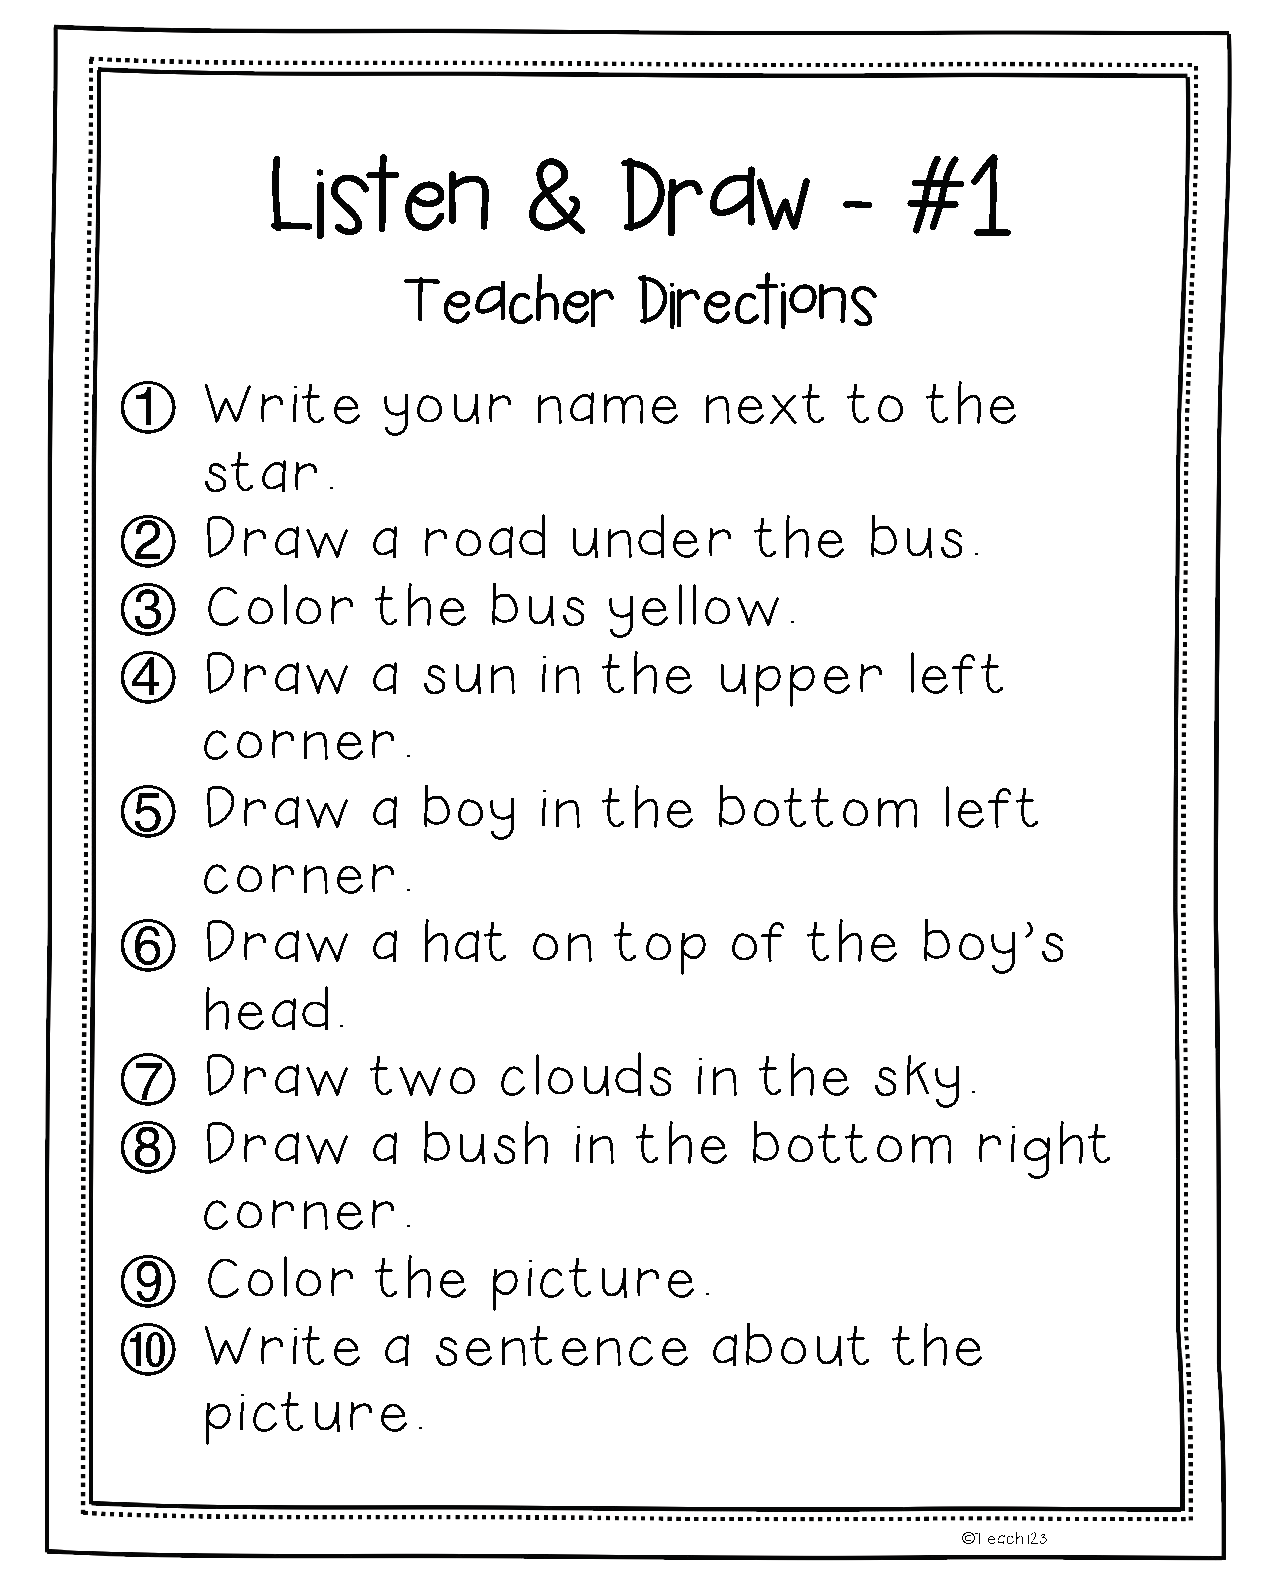
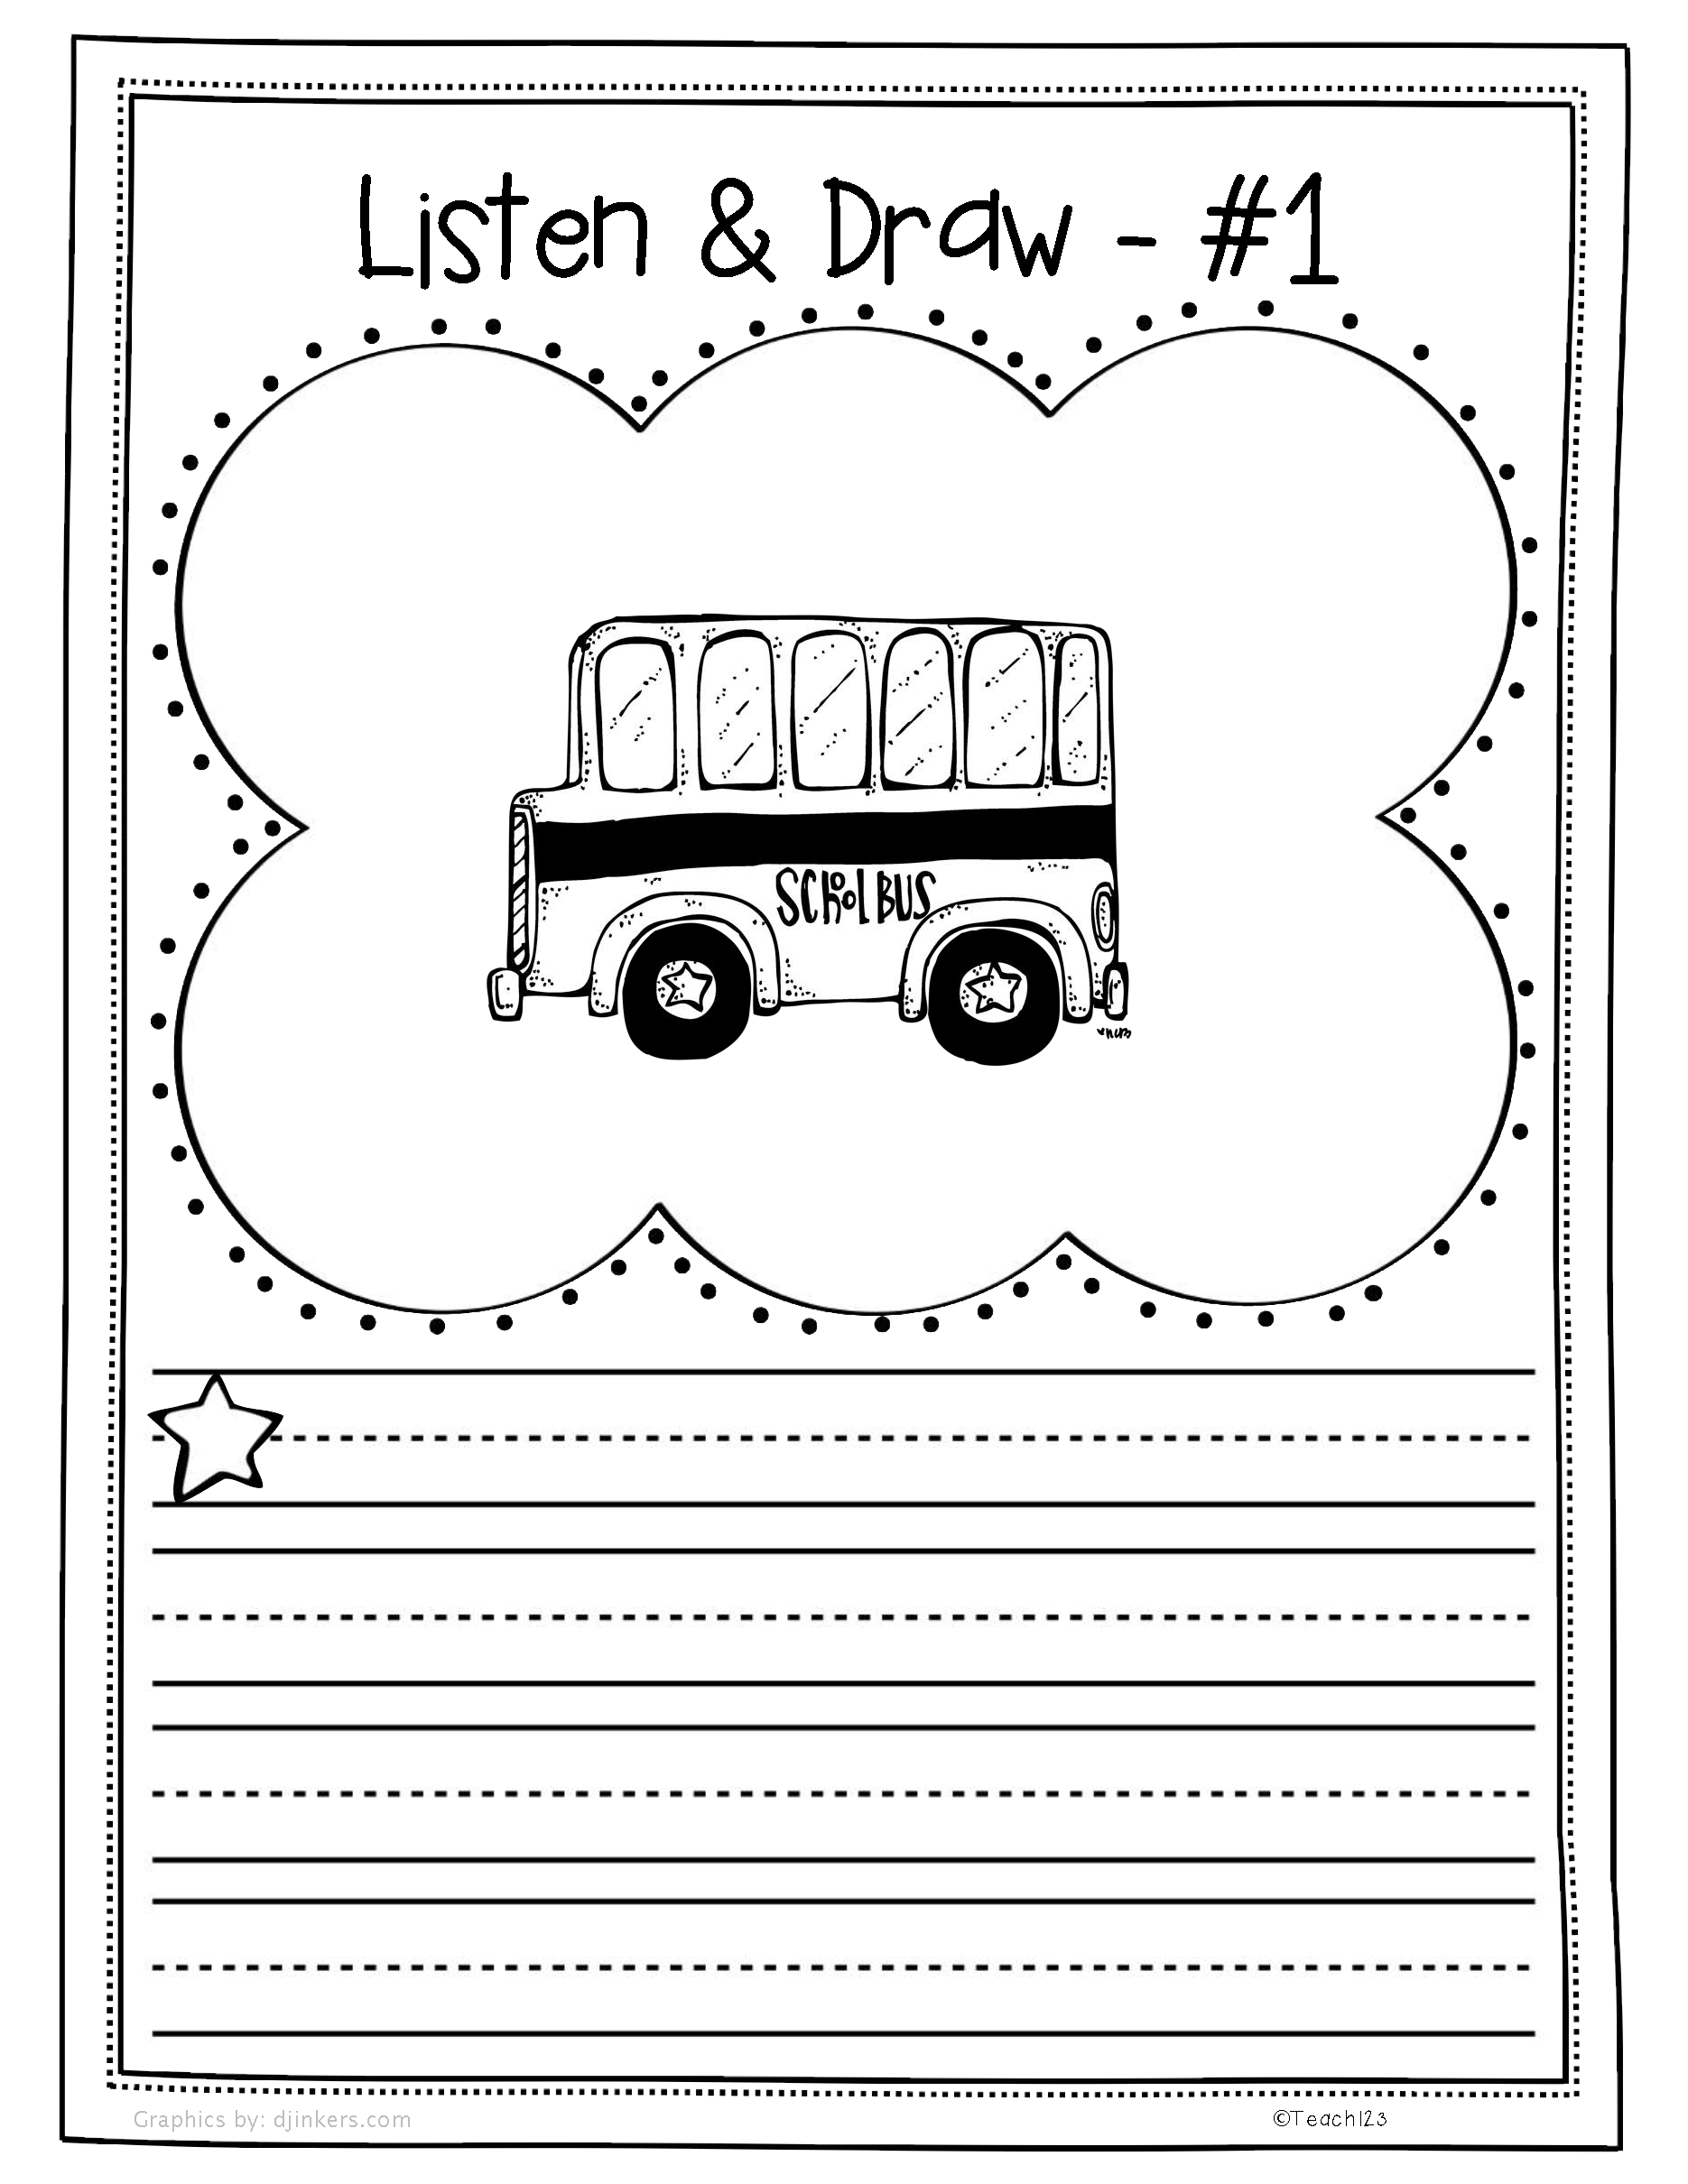
There are so so so many technologies I plan to incorporate into my class after taking this course, but I will narrow it down to a few. The first is using audio recordings. I created an audio file of step by step instructions for students to use in a center station. This is something I never would’ve done or even thought of before this course. I know it will make my life easier because I will not have to stop what I am doing to explain directions to students. The next is using Google Sites to create a classroom website to keep parents up to date with what is going on in my classroom. I’ve used lots of different things in the past, but this is something I’m seriously considering for the upcoming year. Finally, I plan to use the AVL to find resources because I had no idea of the possibilities! Now that I know all that I know, I believe I can use these tools to have a great year and many more to come.

Online Assessment Tools: Friend or Foe?

This week, we spent time looking into different online assessment tools. I’ve always been pretty weary at the thought of using them in my classroom, but not because I don’t like them or think they aren’t a great way to give assessments. The thing is, I teach 1st grade. When they come to my classroom, they don’t really know how to take a test. In Kindergarten, almost everything is read to them. There are typically more pictures on the page than words, if there are any words at all. This means that I have to teach my students how to take a test. We use every test we give as a test on test taking skills. In my opinion, it just seems more practical to introduce online assessments after students are better at taking a test. This is not an excuse to avoid online assessment tools, just a little insight on why they don’t see much use coming from a lower grade teacher. For this assignment, we had to choose two different tools and create sample assessments.

Since I created a Social Studies unit for last week’s assignment, I decided to continue with that for my first sample assessment. I used Kahoot because I am relatively familiar with it and it seems like a very fun and engaging way to assess students. For those who don’t know, Kahoot is a site that can be used to create, play and share fun learning games or quizzes. It allows you to add pictures, videos and diagrams to your questions to increase engagement. Players answer questions on their own or a shared device while questions are displayed on the board for all to see. Correct answers earn points and the faster you answer the more points you receive. They can even be shared as homework assignments and can be done on cellphones! Please check it out if you haven’t already! I used Kahoot to create this School Rules Test.

Figuring out which tool I would use for my second sample assessment wasn’t as easy. I was not very familiar with any of the other tools which isn’t a problem because the point of the assignment is to learn something new. However, a lot of options just seemed better suited for older kids or the free version doesn’t give you as many options. I tried some different options but they just didn’t work out how I planned and I ultimately went with Socrative. Socrative allows you to watch students’ answers in real time or create exit tickets to gauge their understanding of your lesson. Gaps in learning can be easily identified and addressed. The free version doesn’t have as many options as the paid version does, but it is still a great tool to use. I created a quiz on Living Things that you can see below. Overall, I think I am more open to the idea of online assessments, but more so later in the school year!

Audio Files

For this assignment, I decided to create an audio file for a center activity. I thought about creating a digital story, but since we just recently created a video and I have never done a recording like this, I decided to try something new that I can hopefully use in my classroom for future activities.

For this center, my students will be working on a ‘Listen and Draw’ page. For these activities, students are given a page with one object in the middle and the teacher reads directions one at a time to add on to the picture. I will attach the one that I recorded directions for. I normally do these activities in a whole group setting because it is the easiest way for it to get done. With this audio recording, I can leave the papers at one of my center stations and have a device there to play the recording. This way, students can complete the activity in pairs, small groups or even individually. This will give me more time to work with small groups uninterrupted. This will also help with cutting down on down time because everything is already out for students before they begin. They just have to sit down and get started.

I used the Windows Voice Recorder app that was already installed on my computer. It was very easy to use. All you have to do is press play to record and stop once you are finished. I did not really encounter any problems creating the audio file for this lesson. It is something very simple that I haven’t used before but will definitely continue to use. I am thinking about recording all of my center instructions for my students so that I can focus on my small groups and they will have something to follow without having to read or find a friend to read to them! I did however encounter a major problem trying to upload it to this blog. I didn’t realize that you can’t upload audio files with a free WordPress site. When I tried to upload the file into an audio block, it said I needed to upgrade to the premium plan in order to do so. Luckily, I will not need to do this in my classroom. I will be able to use my files as they are.

You can listen to my recording here!

Innovative Instructional Tools

This week, we were tasked with searching some different instructional tools and choosing one to create a lesson. This was a perfect activity for me because my school follows a year round calendar and our students 1st day will be here in a few short weeks. I’ve been working on calendars, plans and tests but haven’t devoted as much time to my instructional materials. I knew I wanted to create something that we could use to teach our first Social Studies unit – School Rules. After looking through as many options as I could handle, I decided to go with Nearpod. I’ve heard of Nearpod before and had a very brief ‘training’ a few summers ago but I had never used it in my classroom and certainly did not know how to go about creating my own lesson. My first task was to figure out what Nearpod really is.

Nearpod allows you to create interactive lessons quickly and easily. You can import pictures, videos, audio files, webpages, pdfs and more. You can also add any of Nearpod’s interactive features like virtual field trips, polls, quizzes, and 3D objects as well. Your lessons consist of slides like you would find in a Power Point. However, with Nearpod you can share a live lesson with students (they will have a code to put in their device), and the lesson will be synced to all devices. I think that’s a great way to keep students engaged during lessons because they have it right there in their hands. I spent a lot of time looking at all of the interactive features they have to offer, but decided that for this lesson it was better if I did not add any. If you don’t know, the beginning of the year in 1st grade can be challenging for both teachers and students. When they get to my class, they’re basically still Kindergarteners so it’s imperative that we focus on learning and following the rules or the year could be lost. I think I will be able to add in some interactive features after mid-quarter and I’m sure my students will be thrilled to try them out! *I considered PlayPosit because I have seen it before and thought it would be fun to try, but I think that would be better suited for after Christmas break. My students are not at all experienced with computers. Seeing as I can’t be at 19 computers at the same time, I decided to wait until I’ve had some time to teach them computer skills.

Check Nearpod out if you haven’t already!

I liked how easy it was to import my content into the lesson. I was able to add in all of my supporting videos, links to activities and a pdf file. I can easily share this lesson with my coworkers and add to it as necessary. It will take away the burden of moving from site to site for all of our resources. We only have 30 minutes each day for Social Studies so there is no time to waste! In the future, I can see us using Nearpod as our main resource for Social Studies and Science because it will make things much easier for us and for our students to follow. The bulk of our day is spent teaching phonics and number sense because it is our job to build the foundation with our students. Social Studies and Science tend to get thrown in with other subjects and put on the back burner so I see this as a way to create fully functional and engaging lessons that our students can follow and eventually we can add in our tests/quizzes.

The biggest challenge I had creating my lesson was trying to figure out how to format my slides so they looked like I wanted. I’m pretty particular about how things look and how they will present and I wasn’t a fan of the available themes. I thought about uploading images for backgrounds but that didn’t work the way I wanted it to. I ended up creating my slides in Power Point and uploading them to my Nearpod lesson. Power Point has tons of themes that I already know and love so it was not very hard once I got started. This lesson only covers the first month of school, so I will continue to add to. Our unit will last for the entire quarter. Overall, I’m very excited to have this in my teacher toolkit!

Check out my lesson here! Join with this code: GBVRD

EDM 510: Video Production for Dummies

The title totally gives away this week’s assignment. We entered the world of video production! We had the option to choose what kind of video we would make so I decided to make an introduction video that I can show to parents at Meet the Teacher and also to my students on the 1st Day of School. I figured it only made sense to create a product that I can use in my classroom. I am not very well versed in video editing but I’ve dabbled a little before. My best friend always creates videos and slideshows for us after major events so I’ve never had to do it for myself. I always love a challenge though so I dove right into this assignment head first.

The first thing I needed to do was figure out where I would film. It made sense to film in my classroom since this is an introduction to my students. I knew I wanted to insert some photos of my family, friends, and hobbies so I made sure to upload them all to my computer and format them correctly for the video. I also wrote down everything I wanted to say because I don’t always do well with unplanned speeches. I say ‘like’ way too much. Once I had everything I thought I would need, I downloaded OpenShot Video Editor because I decided to use the webcam on my computer to record. I recorded all of my clips and then started the editing process.

I had some trouble in the beginning because I had never used this software before and was unsure of how to get my audio to match up with my pictures. It took a lot of clicking undo/redo, a few phone calls and FaceTime videos and a lot of frustration before I finally got the hang of things and could work faster. The hardest part of this assignment was making sure everything was just right on my video. There was one transition that I could not fix but I don’t think it looks that bad. For a first timer, I think I did a pretty good job with my video. I’ll let you be the judge though. Video posted below. Let me know what you think!

https://www.teachertube.com/video/welcome-to-1st-grade-489533

EDM 510: The Evolution of the Internet

For this week’s assignment, we had to choose a web-based tool to create a product detailing the differences between Web 1.0, Web 2.0 and Web 3.0. We also had to give some examples of educational technologies for Web 2.0 and Web 3.0. I decided to use Padlet to compile my research because I like the shelf option. It allowed me to create 4 columns, 1 for each version and and the last one to compare/contrast, which seemed like the best way to present my information. It allows readers to see what and how much falls under each category without having to scroll through slides. I also chose Padlet because it is something I am familiar with. Padlet allows you to create an online bulletin board. You can add text, photos, videos and links. It is a great way to organize thoughts and information into a streamlined design. They have a few different templates that users can choose from. It is easy to navigate which made it the perfect choice for me. Padlet would be a great resource to create unit lessons where you could have all aspects of your presentation in one place. It can make things run smoother in your classroom if you struggle with down time or management.

If you’ve never used it or just want to find out more, check it out here. https://padlet.com/

I started by searching for definitions of Web 1.0, Web 2.0 and Web 3.0 to get a better understanding of what each was. It was not very hard to find information on each of these versions. You can find my Padlet at the bottom of this post.

Through my research, I had some realizations about each version of the Internet. One thing is, we have come a long way since the days of Web 1.0. Sites were basically just for users to consume information. I would not be able to write and share this blog if we were still in the age of Web 1.0. People would not be able to leave comments. Things would be very different. Web 2.0 is more about user-generated content. Think blogs, social networking, and wikis. With the onset of Web 2.0, users were able to collaborate with others to create and share content. Web 3.0 takes it a step further by including Artificial Intelligence (AI) to analyze information on the web and give new data to users. Think smart ads on Amazon or predicted searches on Google.

The hardest part for me was making sure I had good examples. I try to go beyond the answers that are right in front of me and think outside of the box, but for whatever reason, I hit a wall and kept coming up blank. Because of this wall, it took me a lot longer than I had hoped to finish this assignment which meant I had less time for my other class. It was a great lesson in time management because I needed to get both things done.

Made with Padlet

EDM 510: Learning Theory Matrix

For our first week’s assignment, we were to familiarize ourselves with behaviorism, cognitivism, constructivism, and connectivism and create a learning theory matrix. I was already pretty familiar with behaviorism, cognitivism, and constructivism from learning about them in my undergrad classes. I was not as familiar with connectivism. I had heard of it before, but never really studied it. I spent a lot of my time researching what exactly this theory is and how it aligns with technology use in educational settings. Once I began reading I was very interested in learning more about connectivism. I realized that I already am using methods that follow this theory in my classroom without realizing it. It made me stop and think if I’m doing this with any of the other theories. I spent a short period of time reading about each theory because the last time I thoroughly studied them was years ago. During my studies, I decided to challenge myself to think of at least one way I was using each theory with my current class or with previous classes. I came up with some examples that I included in my matrix under examples of specific technology. One thing I learned is that these theories are already influencing my teaching practices, even if I hadn’t acknowledged it before. Now that I am fully aware, I can use my newfound knowledge to improve the way I do things. I did encounter some challenges with this assignment. Like I said before, I haven’t studied the theories since college and I was pretty unfamiliar with connectivism so I had to do some research. Another challenge I faced was that I tend to overthink things and in the process I sometimes overwhelm myself. I have never had a blog before so I spent a lot of time overthinking how it should look, what it should say, etc. I had to bring myself back to reality so I could actually complete the assignment.

My Learning Theory Matrix

Here are links to the resources I used

Learning Theories:

http://thepeakperformancecenter.com/educational-learning/learning/theories/

https://www.sanfordbrown.edu/Student-Life/blog/March-2015/Four-Top-Learning-Theories-in-the-Age

https://www.learning-theories.com/

Connectivism:

http://itdl.org/journal/jan_05/article01.htm

https://joepgaston.wordpress.com/2017/02/16/rethinking-assessment-through-the-theory-of-connectivism/